
DIY Paver Patio
We have a deck off the back of our house. It's nice and all but I have a big family and kids. Plus we are always entertaining and the deck just felt cramped.
I also love a fire pit during the spring, summer, and fall. (And I have been known to run the fireplace in the house when it is below 60 degrees. It’s so cozy!) I have a portable fire pit that we can drag out in the grass for a fire, but I really don't love sitting in the grass with bugs jumping on me and when we move the fire pit the grass under it has died.
Sidebar: I love using my portable fire pit in the driveway for nights like Trick or Treating!
Due to these issues, we decided to expand the seating in the backyard. We discussed whether to expand the deck or just put in a patio. Since our deck is older it would have been a major overhaul to expand the deck. Plus decks require maintenance which is a pain. So we decided to put in a paver patio.
As with everything, we knew we had to go the DIY route since having a patio put in (while far less work) is VERY expensive, and we have student loans and kids. It was not free to put in the patio ourselves, but I have listed the price of the materials and rental costs that we incurred at every step of the way so you have some idea of what the cost might be. The end result is a small fraction of what a professional would have charged us.
I knew absolutely zero about putting in a patio. Fortunately Terry has some landscaping experience from his pre-lawyer days. To be certain, this is not a project I would have endeavored to tackle without Terry. Before you write me off as sitting on the side sipping iced tea (or rosé to be more accurate), you should know that I was involved, working, and sweating at every step of the way.
DIY Paver Patio
Step one: prepare your area.
This usually requires digging out the ground in the area that you select. We mark off the area with spray paint then we dig out the plants, grass, and the dirt.

In the first phase of this patio we did this by hand (all shovel and wheelbarrow) but in the second phase we rented a Bobcat to dig up the dirt. We live in a part of the country that has a pretty dense, clay soil and we had a LOT of dirt to move, not to mention roots of a tree that had to be pulled out. This would have taken a really long time if we did it by hand. We are lawyers with full time jobs and we just did not have the time for it. The Bobcat was wonderful. It was $350 and worth it. Time is money, people.
It took us a full weekend to move all of this dirt and prepare the area. This is just one step, but it is by far the most labor intensive and time consuming step.
It is important to slope the area slightly so when it rains or snows the water runs off away from the house. Pro tip: do NOT slope it toward your HOUSE!
Cost total: $350
Step two: level it out.
The ground has to be level so that your paver patio is not causing your guests to trip and fall. Any lawyer would tell you to reduce your slips and falls! Terry used a shovel to level out the area. He then applied Preen to prevent weeds from popping up in between the bricks. (We already had a big container so we did not need to purchase this.)
We also added French drain during this phase. We have a drain pipe coming off of the house that previously emptied onto the grass. Since we do not want water to dump on the patio, Terry dug a trench for a pourous drain pipe under the area that we planned for the patio and buried it. You can see from the photo below that this was just a shallow trench, enough to have the pipe under the patio, but also deep enough that the water would be absorbed into the ground.
We also picked a spot for the fire ring in this phase. For the fire ring we used a fire pit ring that we purchased at a tractor supply store. It was $41.

Whatever water doesn’t empty through the holes in the pipe empties out into some gravel at the base of the pipe. The pipe is 4 inches by 25 feet. This was $15.

Cost total: $56
Step three: lay the gravel paver base
Terry picked up this paver base from Home Depot in our minivan. He had to make two trips since this stuff is pretty heavy and dense. The bags are so heavy that I could barely lift one. Thankfully we are a two person team!
Our patio (phase two) is about 300 square feet. We used about 100 bags of paver base. The instructions on the bag recommend using enough paver base to create a depth of four inches. We did not adhere to this rule and it was much more shallow in some places. The paver base bags were $4 each.
We dumped the bags out on various spots around the area to be covered, then used a flat rake to spread and even it out.

Cost total: $400
Step four: use a tamper to flatten the base
Terry rented this from a local hardware store. I let him handle this step since he likes the power tools. He used a gas powered tamper to run over the entire paver base to flatten and smash it down so that it made a flat base for the brick layer.
It was about $50 to rent the tamper.

You can see that the tamper packs down the gravel, making it a flat base for the next couple of layers. The picture below shows the outer ring of the area that had been tamped down in contrast to the area on the inner ring that had not.

Step five: lay a sand paver base
For a patio our size we ended up using about 50 bags of sand. Each bag of sand was $3.50. That is about $175.
We tried to evenly distribute these bags and spread them using the back side of a flat rake. It should be about an inch thick. We made it slightly less than an inch. We’re just extra like that. (It saved sand and money.)

Step six: level the sand paver base
To make sure that the bricks are relatively level and that you don't have to move mounds of sand while you are laying the bricks down, you should level out the sand ahead of time. For this step Terry laid down several PVC pipes in the direction that he planned to lay the bricks. Then he used a spare piece of wood to scrape the extra sand off of the top and down the PVC pipe. This is really hard to explain so see the photos and videos below.

Step seven: lay your bricks
Finally, right? You should decide whether you want a pattern and it probably depends on the type of area that you are covering. This step of the process is fun because you are finally wrapping it up, but it also really lets you be creative in how you lay bricks.
You can see from the photos that we chose no particular pattern. I feel like this is easier and keep you from driving yourself crazy trying to get every brick just right. Terry likes to lay the bricks at right angles and seriously could not fathom any other way. This normally works fine but when it came to laying the bricks around the fire pit it was time to think outside of the box.
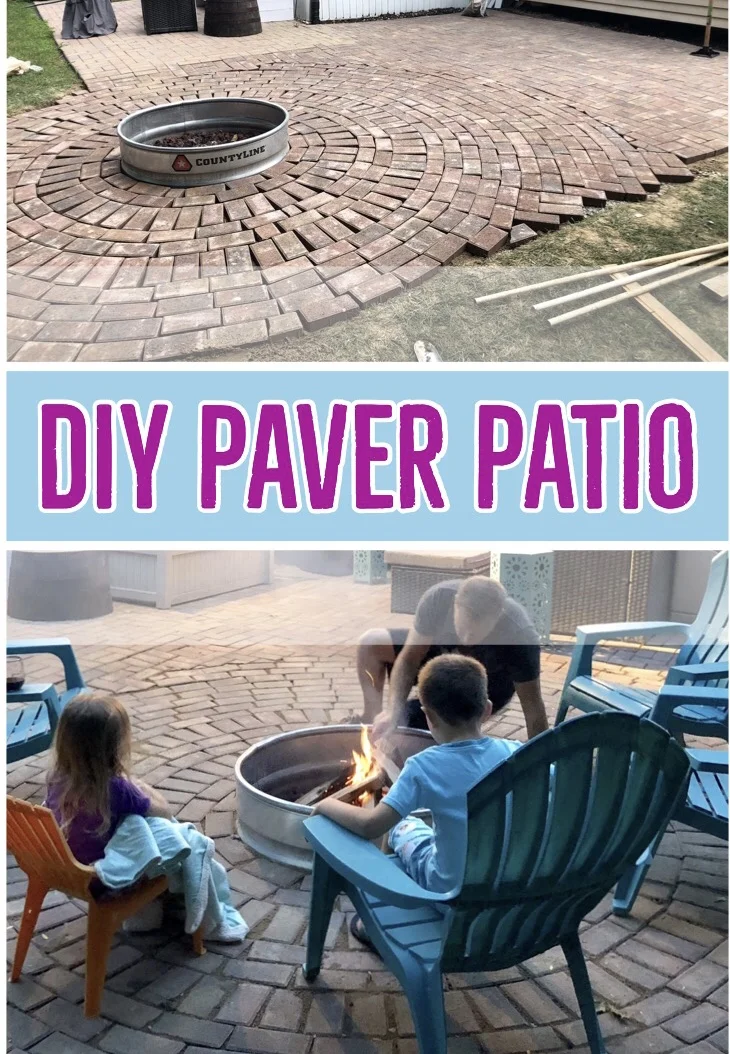
I wanted to lay them around the fire pit like rays of sunshine in a run pattern but Terry was very stressed about fitting it into the square patten that we already had going.

We stood there for a long time while he attempted to convince me that it would not work. Fortunately, I am not easily convinced of anything. In my mind I thought back to my favorite childhood movie, “The Wizard of Oz.” I thought about how the yellow bricks started out in a pattern swirling from blue, pink, and yellow. I figured a circular pattern was both feasible and fun.

I started laying bricks around the fire pit to show Terry what I was imagining. He was worried about the gaps in between the bricks but I reasoned that we could fill them with paver sand.
Terry got on board at about the time that he realized it was twice as fast to lay bricks in this way. It was approximately 95 degrees outside and we were melting so fast was fine with him.

I am so happy with the way it turned out! We had the circles merge with the squared off pattern and I had Terry use a chisel to chop off smaller parts of bricks to fill in the gaps. I love that it is a more interesting pattern to look at.
In a way it represents how he and I think so differently and have to make our ideas fit together. Our brick patio is a small dissertation on marriage.
Cost estimate for the bricks: $650

Step eight: spread paver sand in between the cracks
Almost done! We used the paver base sand to fill the larger cracks in my circular pattern of bricks and ran it over the entire patio.

Then we used this permasand to go between the bricks and bind them once they got wet. You can see from the photo above that we used a push broom to push the sand into the cracks all over the patio. It had to be cleaned a few times during the process since sand stuck to it.
Permasand: $20

Next we let the sand settle between the bricks and dry out for a few hours. We went back and brushed more into the cracks. Then we hosed it all off and set up the furniture to see how it looked!

We are so happy with the result!
Final tally: four weekends, $1,651.
Sadly we finished it on a Sunday which meant we had to get ready for the week instead of relaxing right away. We also had to wait a couple of days for the weather to dry out so we could enjoy it.

The kids are enjoying having a place to lounge outside!

I am asked frequently about the teal side tables. We stack them and cover them when they are not being used. They are from Amazon see below:


I had already purchased some additional sectional seating from Wayfair for this area and I made a trip to Home Goods to find pillows for the sectional. I needed some additional storage for these items but I wanted something functional for the patio as well. I found this bench online.

It holds all of the throw pillows and there are about 11-12 of them. It is sturdy, holds up to 770 pounds and has kept the pillows dry through a very wet two weeks. You can click on the link or one of the photos to find it online also.


It was a lot of work but it was worth it.

